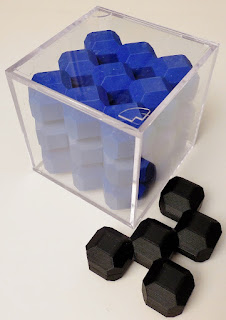
When the puzzle arrived, it had pieces nicely packed in a display case. On close inspection, the packing appeared trivial. I was able to take them out, mix them up, and put them back into the display case easily. I also discovered that there were many solutions. It will be a couple of years before this one will stump me – hopefully.
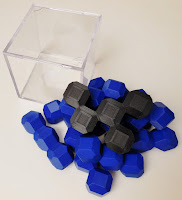
Hold on – there’s another piece in the shipping box that it came in. Surely, it doesn’t go in the case with the other 9 pieces. Since it’s bigger and oddly shaped, maybe it’s supposed to replace one or two of the other pieces. However, having worked with a puzzle or two and the fact that the word melting is in the name, I suspected that the additional piece had to be crammed in the case with the other pieces. You may be tempted to just torch that F’n piece and drip it in between the other pieces, but as puzzlers we’re all about doing things the hard way.
Melting F was made by geometric puzzle packing genius, George Bell, and was his entry in the 2020 Nob Yoshigahara Puzzle Design Competition. This new design is a truncated rhombic dodecahedra packing exercise. The puzzle consists of 10 3-D printed pieces that need to be packed within a clear acrylic display case. The 9 identical blue pieces are made from 3 truncated rhombic dodecahedra while the single F piece is made from 5. You have to squint really hard to convince yourself it looks like an F.
The initial step with these types of puzzles is to determine the type of packing used – in this case, how the truncated rhombic dodecahedra are oriented within the space defined by the display case. This then defines how the pieces can be oriented within the case. Then comes the hard part – determining where the pieces have to go. Although this is not overly difficult, it does take some experimentation to find the solution.
I liked the fact that nine of the pieces were simple identical shapes. It drops the level of complexity and makes the design approachable for any level of puzzler. It also displays nicely in the clear acrylic display case. Melting F can be acquired from George’s PolyPuzzles Etsy Shop when in stock.
On the path of exercising the mind. Expanding developing minds and preserving more mature ones.
Wednesday, January 26, 2022
Wednesday, January 19, 2022
Put It To The - Side Lock
It had been awhile since I’ve played with an Andrew Crowell puzzle, so I headed over to the arcWoodPuzzles shop on Etsy to see what’s new. Andrew is a prolific puzzle designer and there’s always something new. Amongst the fine selection of puzzles, I discovered several intriguing burr lock puzzles and decided to give them a try. The first of the two that I selected was Side Lock.
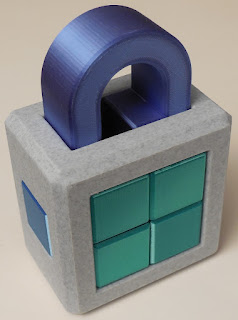
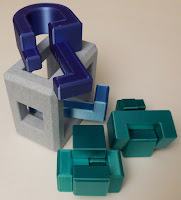
The first thing that surprised me when the puzzles arrived was how big they were. They were twice as big as I was expecting, providing a nice heft for 3D printed puzzles. The puzzle consists of the frame and 6 other pieces: 4 short burr pieces, the longer burr side piece, and the shackle. As expected from puzzles 3D printed by Andrew, the fit and movement of pieces is excellent. The puzzle is also quite attractive, made using a marble-like filament for the frame and shiny blue, green, and purple filament for the pieces.
Since Side Lock arrived assembled and my preference is to attack these types of puzzles as assembly challenges, I quickly disassembled it and planned to leave the pieces untouched for a couple days while any vestiges of piece movement memory quickly decayed. Quite honestly, at this point in my life, anything over 5 minutes is overkill. A couple of months later, I found the pieces and attempted the reassembly.
With an empty frame and 6 pieces, I began tackling the reconstruction of Side Lock. There is a feature within the frame that matches one of the pieces thus revealing the location of the first piece. With the location of the first piece known, the location of the next piece becomes obvious. At this point, I’m thinking, “This is easy, only four more pieces to go!”. However, this was the end of Easy Street forcing me to kickstart that old clunker of gray matter. Where once the old brain could breeze through these problems, I can now feel it wheeze through the process. Eventually, the pieces found themselves in the shape of a lock once again.
I really like these lock shaped burrs and at 19 moves to remove the first piece, it’s a nice little challenge. The one thing that I would like to see changed with the puzzle is to have the name debossed on the outside instead of on the shackle hidden in the frame. I like to be able to reference the name without having to disassemble the puzzle. However, I realize that this is my personal opinion and that there are people that don’t care to have the outside of their puzzles defaced with any type of lettering.
Wednesday, January 12, 2022
Say Hello to – Goodbye
Hello Goodbye!
Yes, we could have wrapped up this blog entry right there but I felt compelled to add some other details. Goodbye is a puzzle designed by Tomas Vanyo and made by NothingYetDesigns (NYD). It’s made from laser cut acrylic with a bolt in each corner to keep it all together and includes a little wooden piece made from Cocobolo. What really caught my attention was the matte black finish on the face with the white lettering. It has such a clean look to it. I also liked the clear mazes but they were a real challenge to photograph. The little wooden piece was made for NYD by Nedeljko Woodworks. It’s always nice to see these types of collaborations within the puzzle community.
The puzzle consists of two maze plates that move in opposite directions within a frame. These maze plates are kept in the frame by the small wooden piece that traps the plates within the frame as well as being trapped itself by the plates. The goal of the puzzle is to determine how to manipulate the pieces within the frame to remove them.
Zig, zag, zig, zig, zag, zig, zag, zag … and 181 moves later, you can remove the trapped wooden piece. It’s not very difficult and you are never in any danger of getting lost. There is also an Aha moment to be enjoyed – no it’s not the fact that you can unscrew the fasteners to take it completely apart and reorganize it.
If you want to continue exploring other possibilities with Goodbye, the maze plates can also be placed within the frame in other orientations. The 181 move orientation that the puzzle arrives with is the maximum number of moves of all the plate combinations.
After the initial release, NYD posted a message on the Mechanical Puzzles Discord (MPD) server indicating that that the puzzle configuration was not optimum for displaying the puzzle after it was solved. It turns out that the puzzle stands up nicely on the edge of the frame, but the engraved wording on the puzzle would be upside-down. NYD indicated that this could be rectified by simply undoing the fasteners and rotating the engraved plate by 180 degrees.
I did rotate the faceplate of my copy of Goodbye and it does display nicely in that orientation. Of course, puzzle orientation is a funny thing. When you start working on a puzzle, you eventually establish what you consider is the orientation for the puzzle. Someone else may have a completely different orientation from you and you might find it odd watching someone else solve it. Since Goodbye comes with the name, designer, and maker on it, it provides a strong sense of which direction is up and which is down. Having already established an orientation of the puzzle before switching the faceplate around, I continue to solve the puzzle in the same manor – now with the words upside-down.
Wednesday, January 5, 2022
Not A Box For Tea, A – T-Box
About the same time that I gave my wife her 6T birthday puzzle, I acquired a copy of T-Box, which, pointed out by my wife, also has six T-shaped pieces in a box. T-Box was designed by Jenga master, Haym Hirsh and made by Mom – no, wait, I had it upside-down - made by Brian Menold at Wood Wonders. This is the latest of Haym’s designs inspired by Jenga pieces. For some, Jenga is a multi-player stacking game with wooden pieces, for others it is a source of raw materials for puzzle making. Hopefully, we won’t see a massive run on Jenga blocks resulting in the worldwide shortages that we saw with tongue depressors (Chico Strikes Again – TD345).
Brian Menold turned the T-Box design into a stunning showpiece. The pieces were upgraded to Birdseye Maple and the box was made from Bloodwood with a Maple Top. What really makes this box stunning is the detailed laser engraving on the sides of the box. Brian is fortunate to have a gifted graphics artist in the family and the design created for the T-Box really makes it something special.
Of course the goal is to get all 6 pieces within the box so that the top lays flush with the sides. To help, or perhaps to hinder, there are a few impediments attached to the interior of the box. Solving the puzzle is not that difficult, but it is a nice challenge. When I was done, I noticed a nice property of the pieces, which can be exploited to solve the puzzle. I’d like to say that, of course I recognized this property and summarily conquered the challenge in one swift stroke, but as usual, I crossed the finish line with a half-lit bulb. Perhaps you’ll come across it and immediately recognize it for what it is. And no, I’m not going to say what it is.
Subscribe to:
Posts (Atom)


